Water Iris
Iris laevigata
The Gardening Year
Best months in UK gardens · full planting calendar →
🖨 Printable care card (PDF)At a Glance
| Botanical name | Iris laevigata |
|---|---|
| Common name(s) | Water Iris |
| Family | Iridaceae |
| Plant type | perennial |
| Height × Spread | 50–100 cm × 10–50 cm |
| Position | Full sun |
| Soil | moist to wet, deep, humus-rich, acid soil; tolerates some lime |
| Flowering | April–May |
| Toxicity | Harmful if eaten |
| Native range | Japan |
Iris laevigata is a classic water garden and damp-border iris for gardeners who want a clean, showy flush of colour in late spring and early summer. Known as the Japanese iris or smooth iris, it is a clump-forming, rhizomatous perennial that combines strong vertical flower stems with broad, sword-like leaves. In the right spot it remains reliable in most UK climates and can be striking in pond edges, bog gardens, and continuously moist borders.
| Quick-care item | Details |
Overview
In British gardens, Iris laevigata is most often encountered as part of the wet-irises group, a practical and visually distinct set of irises that prefer damp conditions. It is different from many dry-border iris groups that cope with average garden moisture; water iris types perform best when moisture is dependable through summer. The species is native to temperate parts of Asia, is not native to Britain, and is grown here because it fills a clear design niche near water features and damp planting zones.
The species is a rhizomatous herbaceous perennial, with narrow, upright sword-shaped leaves and erect stems that carry distinctive flowers in late spring. Typical mature height reaches about 70 cm, while spread remains compact relative to its vertical effect, around 10–50 cm depending on soil and vigour. Individual stems and flower production are less evenly distributed in poor sites, so regular moisture and a settled, fertile base are the major determinants of floral display.
A practical description of the plant for many UK gardeners is simple: it is bold at intervals and architectural when established, but it needs planning for spread. Left unchecked, vigorous clumps can become dense and dominant. For this reason the species is often managed with periodic division and tidy seasonal cutting, not routine heavy pruning.
On the positive side, I. laevigata is dependable in open positions, gives consistent colour, and tolerates the fluctuating British summer better than many less water-adapted irises. It is often selected as a link between a pond, rain garden, or bog border and surrounding bedding, because its natural shape can bridge wet and mesic planting zones.
Appearance
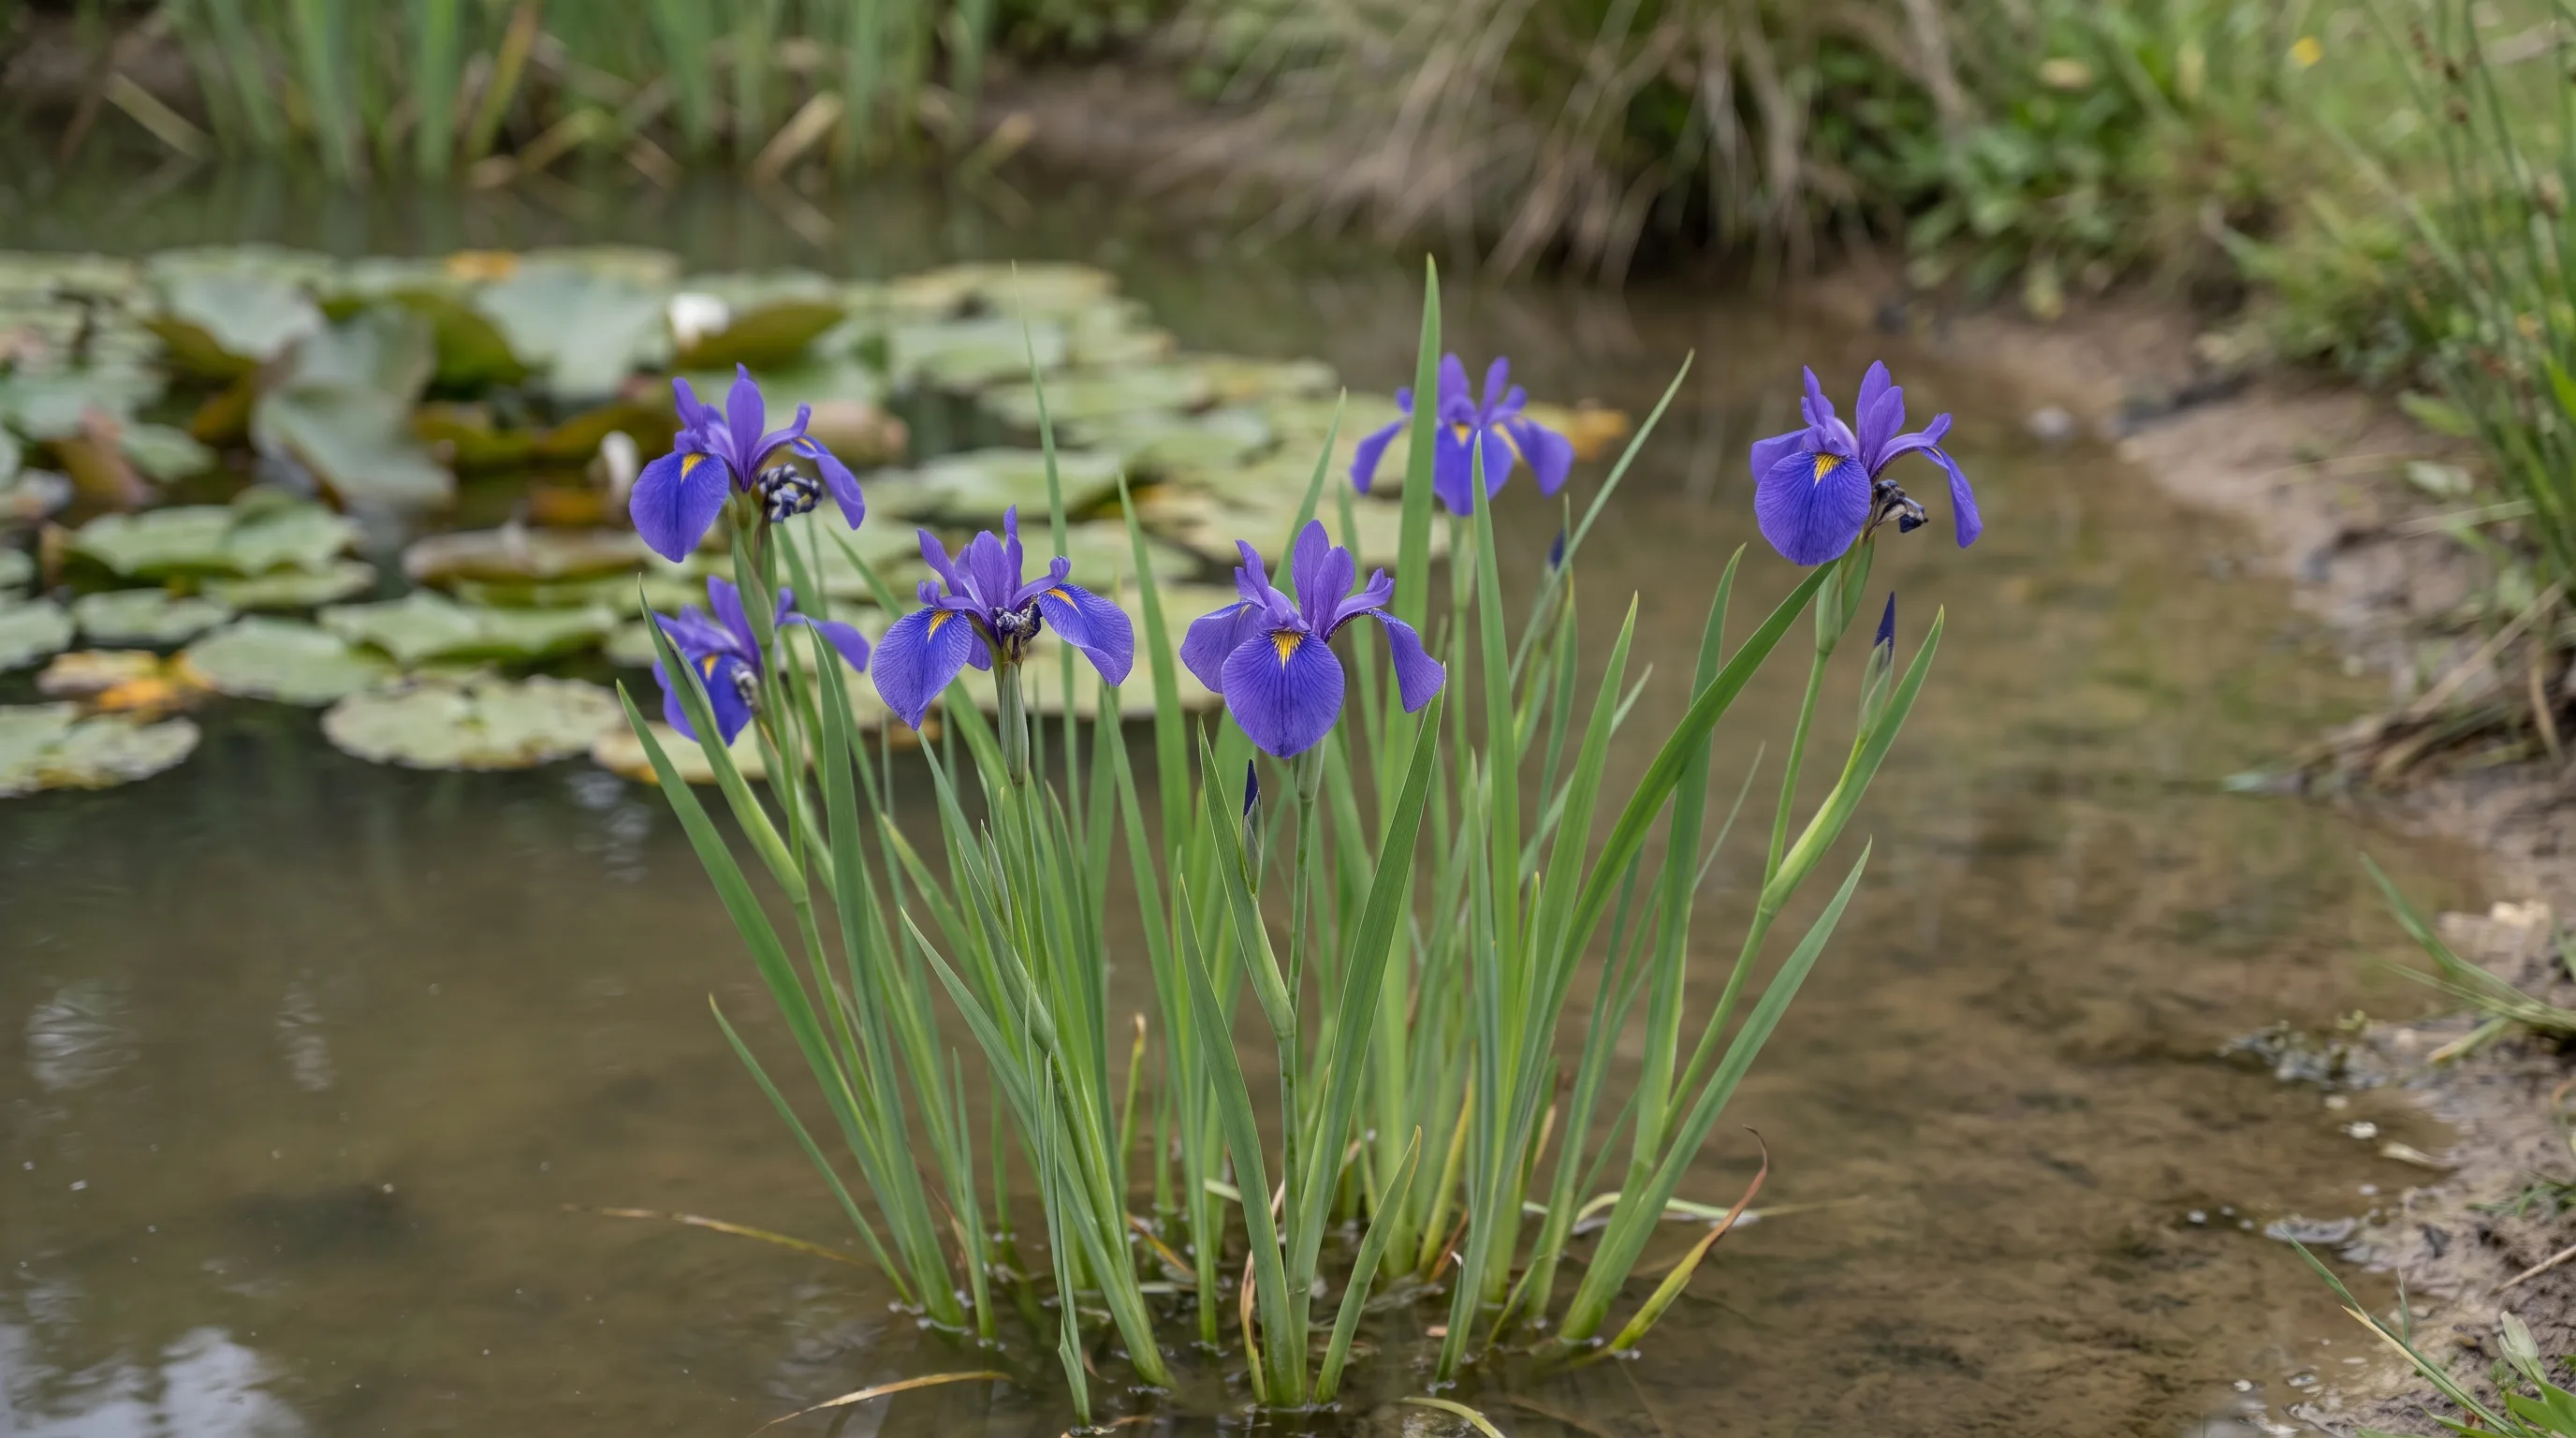
Leaves are upright and grass-like, with a clean, upright structure that gives the clumps a formal outline. Flower spikes rise above the foliage in spring and early summer and carry the characteristic iris form: three larger falling petals and three smaller standing petals. Flowering is compactly timed for the UK season, usually arriving in May and June, with blooms in tones that are commonly purple, blue, and occasionally white depending on cultivar choice.
The visual impact comes from the architecture as much as the blooms. A mature clump forms a tidy fan of leaves and leaf-anchored stems, which makes it suitable for repeat-viewing at different points in the season: first as a compact, vivid rosette in spring, then as a flowering anchor, then as a broad wintering mass after bloom before stems and leaves die back.
A useful distinction for design is between species-level plants and named cultivars. Species material offers dependable form, while named cultivars can alter flower tone and decorative effect. In damp border beds, Iris laevigata can be mixed with rushes, marsh grasses, and sedges, because each shares a visual rhythm in tall linear foliage. In ornamental pond settings it also works with waterlilies, day lilies, and marsh marigold-like companions, where both height contrast and texture contrast can be exploited.
For safety, growers should note that the leaves and rhizomes are potentially harmful if ingested. This is a key horticultural label for families with pets or small children, and handling with basic care (gloves and good hand-washing after touching roots and foliage) is sensible.
Growing Conditions
Climate and site
This species is at home in sunny situations. A genuinely exposed but not scorched position is ideal, though a sheltered south-, west-, or east-facing aspect helps in colder sites and where wind dries the margin around the clump. Full sun maximises flowering quality and keeps stems strong. Deep shade is a common reason for weak blooms, with stems turning leggy and flowers fewer.
Moisture is the key non-negotiable requirement. The plant performs best where soil remains consistently damp and cool in the root zone. It tolerates standing near pond margins and margins of channels, but it does not appreciate having roots constantly submerged; think of damp, saturated edges and rich muddy mixes rather than a permanently flooded pan. Typical garden soils to prefer are clay and loam that can hold moisture, enhanced with humus so that roots find both oxygen and water.
Planting and design works best when soil is not excessively alkaline and not very compacted. Slightly acidic to neutral conditions are widely accepted, which matches many damp garden situations after adding organic matter. In practical terms, a bed with free moisture but good structural crumb, and regular aeration through root-zone improvement, gives better results than pure open mire-like media in a containerless border.
UK growing suitability
The species is widely grown across the UK in pond-edge, bog, and damp-vegetation contexts. It is especially successful where summer rainfall can be supplemented by watering in late dry periods. In very dry summers, watering is the difference between acceptable display and a faded, weakened clump. Where rainfall is higher and evaporation lower, plants establish quickly and usually maintain consistent seasonal growth.
Compared with many other irises, this group can handle moisture-heavy edges without becoming stressed as readily. For UK gardens with winter wetness and summer drying cycles, this resilience makes it suitable in rain-garden style layouts as long as the clumps are not left to suffocate in stagnant mud.
Seasonal behaviour in Britain
- March to April: preparation and best planting window opens. Fresh rhizomes settle more readily while day length and soil conditions increase.
- May to June: principal display period. Flowering is at peak and can look excellent when clumps have room to breathe.
- July to August: maintenance phase, with watering checks and vigour control of crowded centres.
- August to September: useful period for dividing established, congested plants.
- October to November: stems and spent foliage can be cut down once colours have finished.
- December to February: dormant period for routine observation and planning for next year’s maintenance.
Planting and Care
Planting method
Planting is straightforward but benefits from good timing. Late winter and early spring allow establishment, while spring (especially April) gives maximum growing time before heat. For UK situations, growers often plant any time between March and mid-November if watering can keep rhizomes evenly moist, but establishment is easier in spring.
A practical spacing guide is around 50 cm between plants in small groups. This allows clumps to open out without immediate congestion while still looking full. Too tight a spacing increases disease pressure and reduces stem count over time because roots compete and crowd.
When placing in wet ground:
- plant rhizomes level with the pond or water edge at their normal crown height so new growth is not buried too deeply.
- work in well-rotted compost or a rich loam-rich mix and avoid heavy fresh, undecomposed manure.
- ensure a consistently moist top layer through summer without compacting the surface after rain.
In raised or potted pond-edge trials, use a peat-free aquatic compost suited to water-margin planting and containers raised at an edge level where root zone moisture remains high but not anaerobically trapped.
Watering and soil care
Watering policy should follow a simple rule: stable dampness through the season, with drainage preventing stagnant suffocation. In a dry June or July, water deeply and less frequently rather than frequent light watering. The aim is to encourage full root activity rather than superficial greening. Mulching with coarse bark-free leaf materials can help moderate summer evaporative loss, but keep mulch light around crowns to avoid rot-prone sealing.
Regularly check drainage after heavy rain. If crowns sit in cold, stagnant water for prolonged periods, rhizomes can decline into soft-rot issues later in the season. If the site is prone to waterlogging, provide a very slight graded surface tilt, or use a narrow ridge system while still retaining damp edges.
Feeding
The species favours rich, humus-enriched soil more than heavy artificial dosing. A measured approach is to feed lightly in spring from existing organic fertiliser reserves. If the site is lean, add modest balanced feeding after establishment rather than frequent concentrated fertilising. Overfeeding often produces weak, lush growth and can increase fungal pressure.
Propagation
The most dependable propagation route is division. Mid-summer to early autumn is generally the best period for lifting and splitting clumps. Cut rhizomes into small sections with viable roots and leaf fans, trim old roots, and replant promptly in established damp planting. Division every three to four years keeps flower quality high and reduces centre collapse in ageing clumps.
Seed is technically possible and some growers do raise plants from seed; however, it is a slower route and results are variable. Seed should be collected from ripe capsules in autumn, then treated and sown on the surface of germination media with good grit. Germination can be uneven and delayed, so this method is generally used by enthusiasts rather than routine bedding production.
Seasonal care and cut-back
There is no major winter pruning programme. Instead, manage height and season-end tidiness through cutting down old stems after flowering. Remove spent flower stems once blooms fade. In a cold UK winter this naturally progresses to stem death in late autumn, and by early November old growth can be removed down to clean ground level or just above emerging shoots if cutting has been delayed.
Do not prune woody material because this is not a woody shrub-like crop. The correct management is cut-back and renewal through division, not structural pruning.
For winter checks, reduce water and do not overprotect with thick wraps unless exposure is exceptional. Keep the crown area from being deeply heaped in waterlogged soil, then allow plants to pass through a short dormant cycle.
Common mistakes to avoid
- planting in dry, chalk-dry or shallow sites and expecting full irises
- spacing too tightly and expecting quality blooms for many years without division
- using high-nitrogen feed late in the season, which weakens hardiness and structure
- treating all iris species identically rather than matching to wet-irrigation requirements
Common Problems
Iris laevigata is generally forgiving, but it has recurrent issues in ordinary domestic contexts:
Problem 1: Overcrowded, weaker clumps Aged clumps become thin, and flower stems can shorten. The remedy is division of old growth every three to four years, or sooner if stems bunch too tightly. Divide when the clump is actively growing in late summer, then reset immediately in prepared damp planting.
Problem 2: Slug and snail pressure The broad leaves can be nibbled in damp conditions. Physical barriers, hand-picking, and appropriate baiting reduce pressure. Because damage is often localised around emerging tissue, early inspection in spring can prevent obvious leaf loss.
Problem 3: Iris sawfly and similar defoliators Localized feeding on young shoots is manageable with inspection, prompt removal of damaged tissue, and good air movement at planting level.
Problem 4: Soft rot and stem collapse in stagnant pockets This is usually linked to oxygen-starved roots and poor drainage. The plant can survive moisture-rich environments, but not stagnant anaerobic root zones indefinitely. Improve drainage channels and avoid over-deep mud pockets.
Problem 5: Viral, bacterial and grey mould pressure These issues occur more often in stressed, overcrowded, or wet-stressed situations. Reduce crowding, limit excessive feeding, remove compromised leaves, and avoid over-wetting foliage in cool, still weather.
Problem 6: Vigour spreading beyond intention Some plantings are so strong that they migrate. Regular lifting and edge management, especially in mixed borders, keeps this plant decorative rather than dominant.
The plant is not generally a beginner’s problem if the moisture system is right. Most failures come from mismatch of planting site or ignoring the annual maintenance rhythm.
Popular Varieties
At least three named forms are commonly grown in the UK market and are useful for selecting flower character while keeping species habits and requirements.
- Iris laevigata 'Regal' – a compact pink-to-red form with a white central stripe, often used where the species is wanted as a clean, formal pond-side accent.
- Iris laevigata 'Albopurpurea' – notable for silvery-green foliage and flowers showing white with purple-blue tones, suitable when stronger foliage contrast is desired.
- Iris laevigata 'Variegata' (v) – a variegated foliage form with striped leaves and rich purple-blue blooms, valued as a seasonal highlight in bog and marsh-style borders.
- Iris laevigata 'Odiham' (v) – a variegated option seen in nursery trade and useful where leaf pattern is a priority.
- Iris laevigata 'Weymouth Purity' / 'Weymouth Elegant' – useful naming group for growers sourcing named material with dependable garden behaviour.
Choose by planting context as much as by flower colour. In a watery edge design, consistency of height and foliage texture is often more important than one-off novelty colour.
When introducing named forms, keep them in groups of three to five plants where possible, so clumps settle with enough mass for reliable stems and stronger stems through the first full season.
The best outcome with Japanese iris is achieved by planning around its seasonal cycle rather than forcing it to behave like a dry-border iris. Good moisture, full light, and planned rejuvenation every few years produce the strongest flowering and the most predictable design result.
Pests and Diseases
| Problem | Symptoms | Management |
|---|---|---|
| Slugs and snails | Irregular holes chewed in leaves and flowers, often accompanied by silky trails. | Use physical barriers like copper tape or hand-pick at night; avoid chemical slug pellets where possible. |
| Iris sawfly | Leaves appear to be cut off at the base as larvae feed inside the leaf sheath. | Inspect plants regularly in spring and remove infested leaves or apply biological controls like nematodes. |
| Bacterial soft rot | The base of the plant becomes mushy, discoloured, and emits a foul odour. | Ensure excellent drainage and air circulation; remove and destroy affected plants immediately to prevent spread. |
| Grey mould (Botrytis) | Fuzzy grey fungal growth on flowers and leaves, particularly in damp, humid conditions. | Improve air circulation around plants and remove dead or decaying flower heads promptly. |
| Iris leaf spot | Small, brownish-purple spots with yellow haloes appear on the foliage. | Remove infected leaves and clear away all leaf debris at the end of the growing season to reduce overwintering spores. |
For step-by-step help, read Dealing with Slugs and Snails. Or browse the full plant problem solver to diagnose an issue by symptom.
Recommended Products
GardenWizz earns a commission from qualifying purchases made through affiliate links on this page (including links within the article) — as an Amazon Associate, and from Thompson & Morgan via the Awin network. This does not affect the price you pay. See our disclaimer for details.